Power washing is a fast and effective way to remove dirt, mildew, and grime from exterior surfaces—but when it comes to painted surfaces, one wrong move can lead to peeling paint, water damage, or costly repairs. 😬
Whether you’re cleaning painted siding, fences, decks, or even furniture, using the right technique and pressure level is crucial to avoid damage while still getting the job done.
In this guide, we’ll walk through the essential dos and don’ts of power washing painted surfaces, including how to prep, what tools to use, and how to protect the paint you want to keep.
🎨 Common Painted Surfaces You Can Power Wash
Not all paint jobs are created equal, and not every painted surface is safe to pressure wash. Here are some that can typically handle power washing, with care:
- Wood siding (if well-maintained)
- Brick walls with painted accents
- Concrete patios or pool decks with paint or epoxy
- Fences or railings
- Outdoor furniture with weather-resistant finishes
- Metal siding or sheds
If the paint is chipping, flaking, or extremely old, it’s best to skip power washing and consider repainting instead.
✅ DO: Inspect the Paint First
Before you even start your machine, do a visual inspection:
- Is the paint peeling or bubbling?
- Are there signs of mold, mildew, or water damage?
- Is the paint more than 10 years old?
If the answer to any of these is yes, proceed with caution—or avoid power washing altogether. Pressure can force water behind the surface, leading to hidden mold or rot.
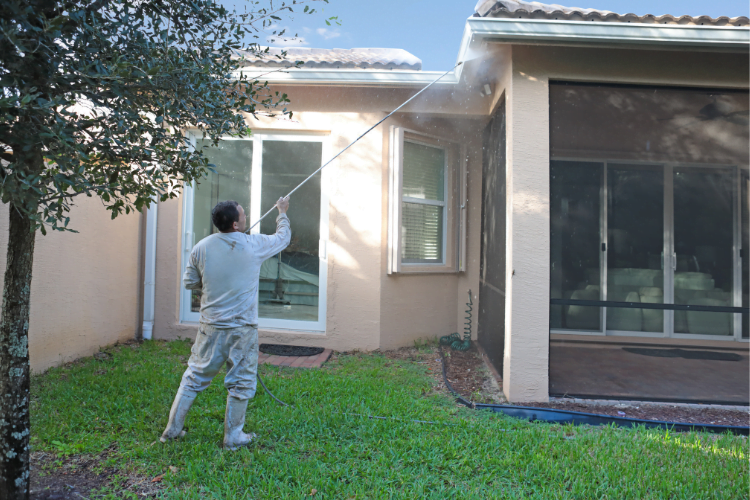
❌ DON’T: Use High Pressure on Painted Wood or Siding
This is one of the most common mistakes homeowners make.
Using too much PSI can:
- Strip paint unintentionally
- Splinter wooden surfaces
- Create lines or streaks
- Allow water to seep behind siding
Stick to a pressure range between 500 and 1,200 PSI for painted wood, and use a 25° or 40° nozzle to spread out the force. Always test a small area first. 🧪
✅ DO: Use Gentle Detergents
A mild cleaner made for painted exteriors will help lift dirt without damaging the surface. Look for labels that say:
- “Safe for painted surfaces”
- “Biodegradable”
- “Low suds”
Apply the detergent using a pump sprayer or your pressure washer’s detergent tank, and let it dwell for 5–10 minutes before rinsing. Don’t let it dry on the surface. 🧴
Browse Amazon Here For Popular Power Washing Detergents
❌ DON’T: Spray Upward or at Sharp Angles
Spraying upward—especially on siding or wood panels—can drive water behind the paint or under the surface, where it can rot the wood or promote mold growth. 💧
Always spray in the direction of the boards or siding, usually from top to bottom, and hold the nozzle at a 45-degree angle for best results.
✅ DO: Keep a Safe Distance
Start by holding the wand at least 18–24 inches away from the surface, and move closer only if necessary. Too close, and you risk gouging or damaging the paint.
Keep your strokes even and overlap slightly to avoid streaks.
❌ DON’T: Power Wash Lead-Based Paint
If your home was built before 1978, there’s a chance the paint contains lead. Power washing lead paint can be hazardous—it spreads lead dust and particles into the air and environment.
Instead, consult a certified lead abatement professional for guidance.
✅ DO: Cover Nearby Areas
Protect:
- Plants
- Windows
- Light fixtures
- Electrical outlets
Use plastic sheeting or tarps to shield nearby items from overspray and detergent runoff. 🌿
❌ DON’T: Power Wash on Extremely Hot or Sunny Days
The heat can cause the detergent to dry too fast, leaving streaks or residue. It can also make the paint more brittle or prone to flaking.
Early morning or late afternoon on a mild day is ideal.
🔄 Aftercare: What to Do After Power Washing
- Allow the surface to dry completely
- Inspect for any peeling or damage
- If touch-ups are needed, do so with matching exterior-grade paint
- Consider sealing the surface with a UV-protective finish if exposed to sun
Regular cleaning once or twice a year helps maintain the surface without over-washing.
🏡 Final Thoughts
Power washing painted surfaces can be safe, effective, and incredibly satisfying—as long as you follow best practices and avoid the pitfalls. 🎯
With the right pressure, nozzle, cleaning solution, and technique, you can restore your home’s painted features to a fresh, clean look without lifting a single chip of paint. Just remember: gentle is better, and prep work is key.
Browse Amazon Here For Top Rated Power Washers And Accessories


