A clean, bright fence can dramatically improve the look of your property. But when that wood or vinyl starts turning green from algae or brown with grime, it’s tempting to break out the pressure washer and blast away the dirt. 🚀
Here’s the thing: you can absolutely damage a fence with a pressure washer if you’re not careful. From gouging wooden boards to warping vinyl, a lot can go wrong if you use the wrong pressure, nozzle, or technique.
But don’t worry—this guide will show you how to pressure wash your fence the right way, so you get it clean without causing any harm. ✅🧼
🛑 Common Fence Materials That Need Caution
Different fencing materials react differently to high-pressure water. Here’s how they stack up:
- Wood (cedar, pine, redwood): Soft and porous—very easy to damage with high PSI
- Vinyl: More durable, but can warp or dent under too much pressure
- Metal: Rust-prone—needs drying and protection afterward
- Composite: Can be etched or discolored if you’re too aggressive
No matter the material, technique matters. Let’s break it down.
🔧 Step-by-Step: How to Pressure Wash a Fence Safely
1. Inspect the Fence First 🔍
Walk the length of the fence and check for:
- Loose nails or screws
- Splintered or cracked boards
- Sagging or leaning posts
- Mold or mildew growth
🧰 Make minor repairs before washing to avoid making existing damage worse.
2. Choose the Right Pressure Washer Settings ⚙️
- Use 1,500–2,000 PSI for wood fences
- Up to 2,500 PSI is usually safe for vinyl or composite
- Never exceed 3,000 PSI for residential fences
💡 Start at the lowest pressure setting and work your way up only if needed.
3. Use a Wide-Angle Nozzle 🔫
Stick to:
- 25° (green) for moderate power
- 40° (white) for gentle washing
❌ Avoid 0° or 15° tips—these are too harsh and can easily damage fence surfaces.
4. Maintain a Safe Distance
Hold the spray wand:
- 12 to 24 inches from the fence
- At a 45-degree angle to avoid driving water deep into the wood grain or seams
🏹 Keep your strokes even and consistent—no lingering in one spot!
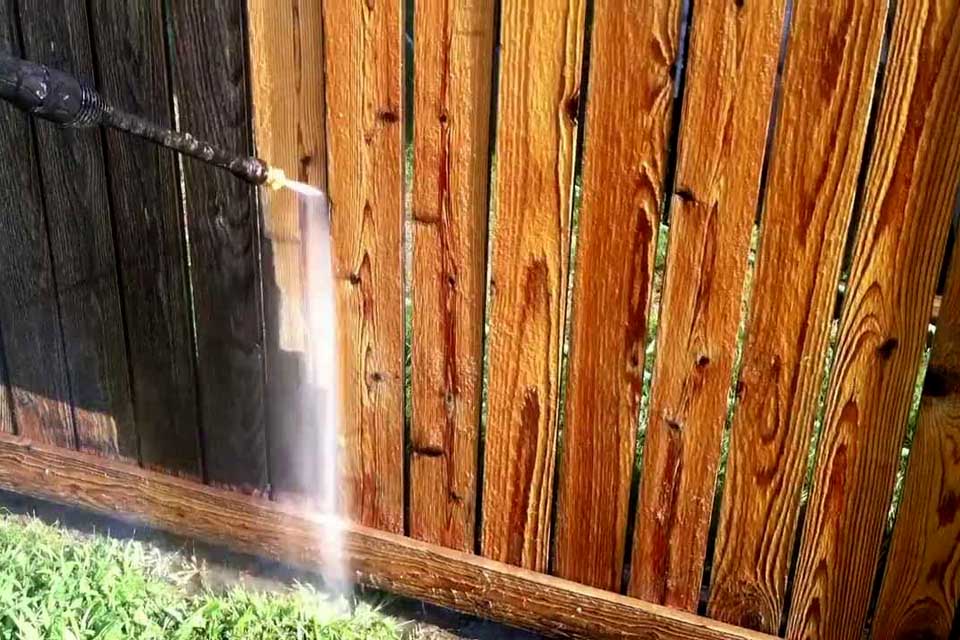
5. Work in Sections
Tackle the fence in small 3–4 foot sections:
- Spray top to bottom
- Use long, overlapping passes
- Rinse each section before it dries to avoid streaking
🌞 Don’t clean in direct sunlight if possible—it causes water and detergent to dry too fast.
6. Use Soap or Cleaner (Optional but Helpful) 🧴
For fences with heavy algae or mildew:
- Apply a fence-safe detergent with a soap nozzle or sprayer
- Let it dwell for 5–10 minutes (don’t let it dry)
- Rinse with a low-pressure spray
✅ Look for eco-friendly cleaners that are safe for nearby grass or landscaping.
Browse Amazon Here For Popular Pressure Washers And Accessories
🧼 Drying and Post-Wash Care
After pressure washing:
- Let the fence air dry for 24–48 hours
- Check for soft spots or splintering
- If desired, apply sealant or stain to protect the wood and keep it looking fresh
🪵 Wooden fences benefit most from sealing every 2–3 years.
❌ Mistakes to Avoid
- Spraying too close—this gouges wood or cracks vinyl
- Using a turbo or 0° nozzle
- Holding the wand in one spot too long
- Washing from the wrong angle (which drives water into seams)
- Ignoring pre-cleaning inspections
Even a few seconds of high-pressure spray in the wrong spot can permanently scar a fence. 😬
✅ Pro Tips for the Best Results
- Use a surface cleaner for fence posts or base areas
- Rinse plants nearby before and after to dilute runoff
- Wear eye protection—debris flies! 🥽
- Use gentle soap instead of relying on pressure alone
🧠 Final Thoughts
Pressure washing a fence is totally doable—you just need the right balance of pressure, angle, and patience. Whether it’s wooden, vinyl, or composite, you can restore its original beauty without causing damage. 🌟
To recap:
- Keep PSI under control
- Use wide nozzles and soft angles
- Rinse thoroughly and let it dry
- Avoid lingering in one spot or over-washing
Your fence will go from weathered and worn to crisp and clean—all without a splinter in sight. 💪🧽🏡
Browse Amazon Here For Popular Pressure Washers And Accessories