In the world of power washing, seeing is believing. One of the most powerful marketing tools at your disposal isn’t a flashy ad, a perfect sales pitch, or even your Google reviews—it’s your before-and-after photos.
These images don’t just show off your work—they prove it. And when used strategically, they can help you build trust, attract leads, and convert prospects into loyal paying customers. 🚿📈
In this guide, we’ll walk through how to take, organize, and use before-and-after photos in a way that boosts your credibility and grows your business.
📷 Why Before-and-After Photos Matter
Let’s face it—many customers don’t fully understand what power washing can do until they see the difference. Before-and-after photos:
✅ Visually demonstrate your skill and results
✅ Build immediate trust (proof over promises)
✅ Show potential clients what they’re missing
✅ Make your business stand out from competitors
✅ Boost conversions on websites, ads, and social media
A single compelling photo can say more than 1,000 words—or a 5-star review. 💬👀
📱 Step 1: Use the Right Equipment
You don’t need a DSLR camera to get quality shots. Your smartphone works just fine—if you use it correctly.
✅ Use a newer iPhone or Android with good camera quality
✅ Wipe the lens before taking photos
✅ Use natural lighting—avoid harsh sun or deep shadows
✅ Hold the camera steady or use a tripod for cleaner framing
Tip: Always shoot from the same angle for both before and after. Consistency makes the transformation more dramatic. 🔄📸
🕐 Step 2: Capture the Right Moment
Take your “before” shots before you touch a single surface. Don’t forget to get:
- Dirty siding
- Oil-stained driveways
- Mildew-covered decks
- Grimy patios
- Fence lines
- Rust stains
Then, take “after” shots immediately after cleaning—while the results are fresh and striking.
💡 Bonus: Snap a few progress photos for time-lapse content later.
🔲 Step 3: Frame It Right
Framing makes all the difference:
✅ Keep the angle consistent between before and after
✅ Stand far enough back to capture full surface area
✅ Don’t zoom in—crop later if needed
✅ Avoid clutter (no tools, hoses, or random objects in the shot)
Tip: Include part of the surrounding area (like a mailbox, tree, or window frame) to emphasize the transformation. 🌳🏠
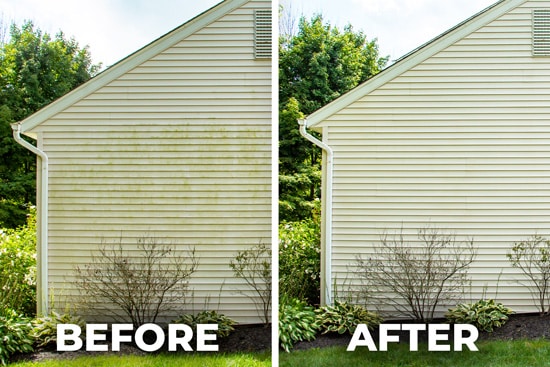
🖼️ Step 4: Create Side-by-Side Collages
Use a free app like Canva, Snapseed, or Layout to turn your two photos into a clean side-by-side image.
🎯 Label each image clearly:
- “Before” | “After”
- Add your logo or watermark in the corner
- Include a short caption: “Driveway transformation in just 45 minutes!”
These images become portable proof of your results—easy to drop into any marketing campaign.
📲 Step 5: Share Everywhere
Now that you have killer visuals, use them strategically:
📱 Social Media
Post regularly on Facebook, Instagram, and TikTok. Use captions like:
- “Swipe to see this deck go from drab to fab! 💦”
- “You won’t believe this rust removal job!”
🖥️ Your Website
Add a “Before & After Gallery” or use sliders to let users reveal results by dragging.
📣 Google Business Profile
Upload your best images here. It improves your listing and helps with local SEO.
📧 Email Marketing
Drop photos into your emails with a quick story:
“Check out how we helped this homeowner restore their curb appeal in under 2 hours.”
🧾 Quotes and Invoices
Attach relevant before-and-after images when sending a quote to impress prospective clients.
🧠 Step 6: Tell the Story Behind the Job
Don’t just post the picture—tell the story. Use a short caption like:
“This driveway had years of oil and grime buildup. We used a hot water pressure system with a degreaser blend, and boom—like new again. 💥🚿”
Stories humanize your business and help potential clients imagine you solving their problems.
🔒 Step 7: Organize Your Photos for Easy Use
Over time, you’ll build a large photo library. Keep it organized by:
🗂️ Creating folders by:
- Service type (deck, roof, siding, etc.)
- Address or client name
- Date
✅ Add keywords or tags like “oil stain removal” or “soft wash siding” for quick searching later.
🧠 Use these photos to build an archive for future marketing campaigns, print materials, and client presentations.
🔁 Step 8: Repurpose Your Visuals
One before-and-after photo can be used in dozens of ways:
🎥 Turn it into a slideshow or reel
🧽 Use it in an FAQ section (“Will pressure washing damage my deck?”)
📊 Include it in a pitch to property managers or commercial accounts
🧼 Turn it into a Facebook ad: “Curb appeal starts here—book your exterior cleaning now!”
📣 Pro tip: Pair your photo with a testimonial from the client for maximum impact.
💬 Final Thoughts
Before-and-after photos are your best silent salesperson. They show potential clients exactly what they’ll get—and build trust before you ever pick up the phone.
Start taking photos of every job. Build your gallery. Share your wins. And watch how quickly the right visuals lead to more clicks, calls, and contracts. 📈📞