Driveways take a beating year-round—whether from cars, oil leaks, falling leaves, or simply the passage of time. While many homeowners focus on the surface, it’s the expansion joints and cracks that often hide the most dirt, weeds, and debris. Power washing these areas can dramatically improve your driveway’s appearance and prevent long-term damage—but only if done properly.
In this article, we’ll break down how to power wash driveway expansion joints and cracks without making things worse, and how to prep for sealing or repairs afterward.
🧱 What Are Expansion Joints?
Expansion joints are the intentional gaps built into driveways (especially concrete) to allow for movement due to temperature changes. Without them, your driveway would crack and buckle under pressure. Over time, though, these joints fill with:
- Dirt and soil
- Moss, algae, and weeds 🌱
- Broken filler material
- Insects or small animals
- Water that freezes and expands
Power washing helps clear them out, but it must be done carefully to avoid damaging the structure or displacing joint material.
🔍 Common Issues Found in Driveway Joints and Cracks
- Moss and weed growth due to moisture and soil
- Built-up grime making the driveway look older than it is
- Cracked or missing joint filler, allowing water to seep in
- Insect nests (like ants or wasps) burrowing along cracks
- Trip hazards or erosion if left untreated
By cleaning these areas with a pressure washer, you’re not just improving aesthetics—you’re preventing expensive structural repairs down the road.
✅ What You’ll Need
- Pressure washer (ideally 2,000–3,000 PSI)
- 15° or 25° spray nozzle tip
- Turbo nozzle (optional for tough debris)
- Concrete-safe detergent
- Weed removal tool or scraper
- Joint filler or backer rod (if sealing later)
- Safety glasses and gloves
- Broom or leaf blower for cleanup
🧼 Step-by-Step: Power Washing Expansion Joints & Cracks
1. Clear Loose Debris
Before blasting anything with pressure:
- Sweep or blow away loose leaves, sticks, and dirt
- Use a weeding tool to pull up any visible vegetation 🌿
- For deep weeds or roots, dig gently to avoid widening the crack
2. Apply a Cleaner (Optional)
Spray a biodegradable detergent onto the joints and cracks. This helps loosen any organic buildup like moss, algae, or mildew. Let it soak for 5–10 minutes, but don’t let it dry.
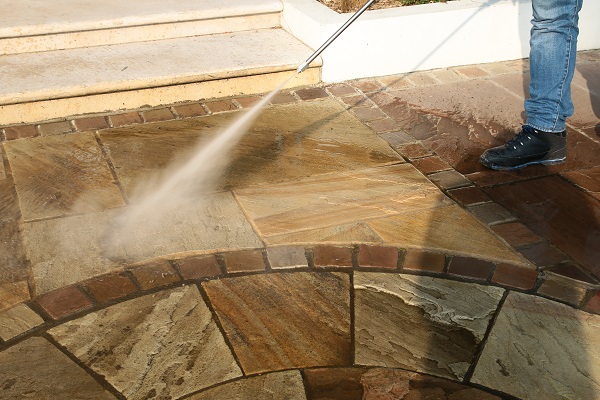
3. Use a Focused Nozzle (With Caution)
Use a 15° or 25° nozzle to clean the joints. A 0° nozzle is too powerful and may erode the concrete edges or widen the crack.
- Hold the wand at an angle, not directly down
- Keep the nozzle at least 6–8 inches away
- Use short, controlled bursts to dislodge debris
- Work in small sections and rinse as you go
⚠️ For wider cracks or deep-set grime, a turbo nozzle can be helpful—but be sure to test it in an inconspicuous area first.
4. Rinse and Remove Dislodged Debris
After you’ve loosened the gunk, rinse the joints thoroughly. You may need to use a small tool or brush to remove remaining clumps or weeds.
Use a wet/dry vacuum if the debris gathers too much in one spot and causes puddling.
5. Let Dry Thoroughly
Before sealing or refilling joints, allow the cleaned cracks to dry for 24–48 hours, especially if you plan to use filler material.
🧱 After Cleaning: Repair and Seal
Once your expansion joints and cracks are clean and dry, it’s the perfect opportunity to:
- Re-caulk joints with flexible filler
- Install backer rods in deeper joints
- Apply concrete sealer over the surface to prevent future infiltration
- Add polymeric sand to control weed regrowth in wide gaps
This prevents water penetration, reduces weed growth, and adds years to your driveway’s life 🚗🛡️.
🧠 Extra Tips for Best Results
- Clean joints once or twice a year—spring and fall are ideal
- For joint filler removal, use a putty knife or oscillating tool
- Never spray directly into cracks at full pressure
- Use hot water pressure washers for grease-stained joints
- Add a bit of white vinegar to your cleaner to kill mold naturally 🌿
🚫 Common Mistakes to Avoid
- ❌ Using too much pressure and chipping concrete edges
- ❌ Forgetting to wear eye protection (debris flies!)
- ❌ Not allowing enough drying time before resealing
- ❌ Ignoring standing water or drainage issues afterward
- ❌ Skipping the cleaning altogether and sealing over grime
🌎 Eco-Friendly Joint Cleaning
If your driveway leads toward a storm drain or street:
- Use biodegradable detergent only
- Redirect runoff to gravel or soil where it can filter naturally
- Avoid using bleach, which can damage nearby lawns or flowers
- Clean when it’s dry and sunny, so the area dries faster
💬 Final Thoughts
Driveway expansion joints and cracks may seem like small details, but they can have a big impact on your home’s appearance and integrity. Power washing them the right way helps eliminate weeds, restore curb appeal, and set you up for successful sealing or repairs.
Just remember—go easy on the pressure, keep your angles shallow, and don’t forget the safety gear. A clean driveway doesn’t just look great—it lasts longer, too 🧼🚘💪.