A mobile rig is the backbone of a serious power washing business. It’s not just your transportation — it’s your mobile command center. Done right, your rig saves time, reduces fatigue, makes you look more professional, and helps you take on bigger jobs with confidence. 💪🧽
Whether you’re just starting out or upgrading from a basic setup, this guide walks you through the essentials of building a mobile rig that’s efficient, reliable, and ready to roll.
Let’s break down everything you need to know to set up a mobile power washing rig that works as hard as you do. 🧰🚐💨
🧱 Step 1: Choose the Right Base — Truck, Van, or Trailer?
Your first decision is what kind of vehicle will support your setup.
🚚 Pickup Truck (Half-Ton or Full-Ton)
Pros:
- Affordable entry point
- Easy to maneuver
- Great for residential jobs
Cons:
- Limited space
- Payload capacity may restrict water tank size
🚐 Cargo Van
Pros:
- Weatherproof storage
- Easy branding and wraps
- Safer storage for chemicals
Cons:
- Height limitations inside
- Less modular than a trailer
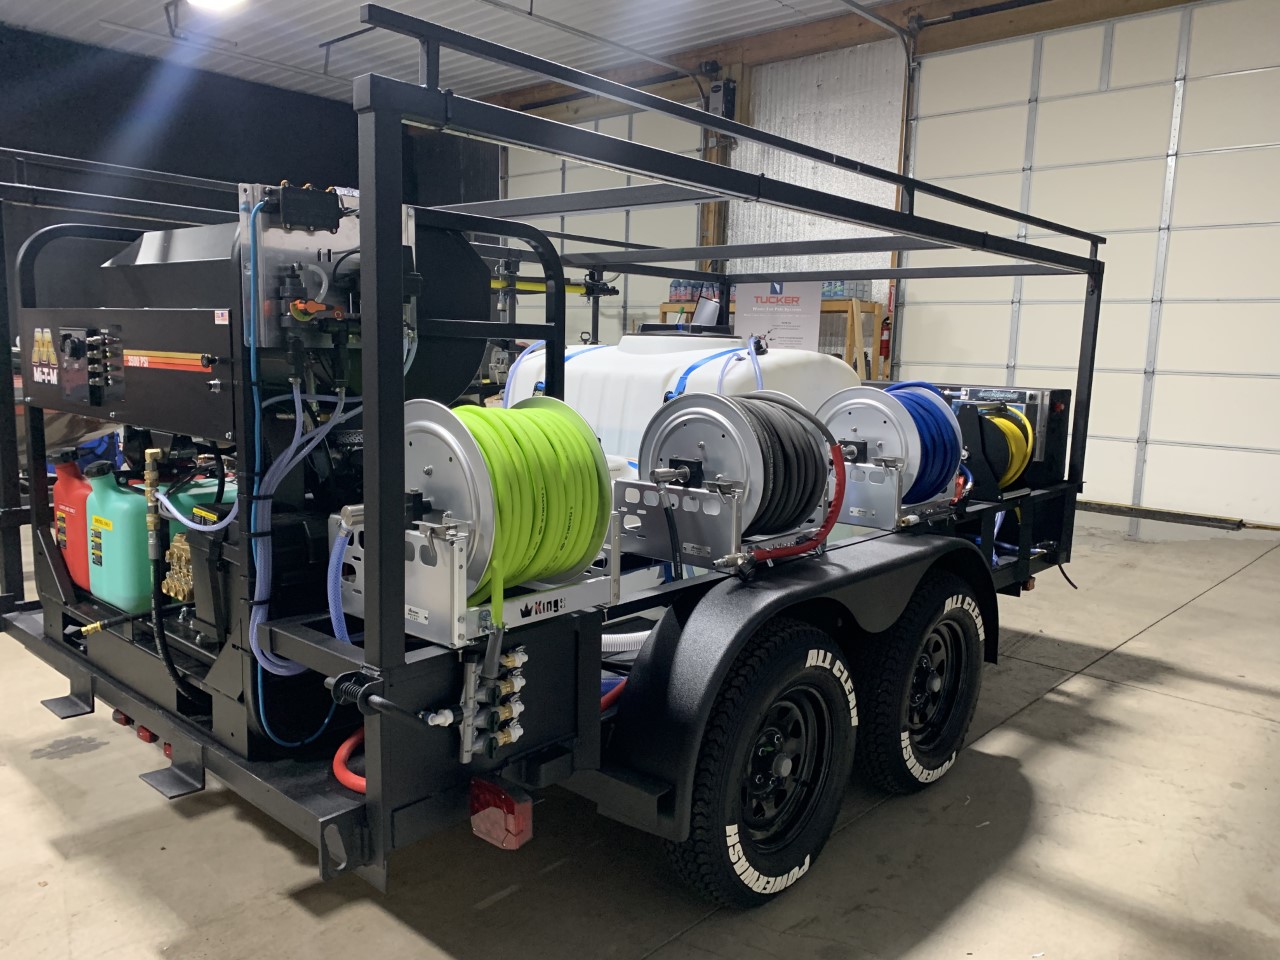
🚛 Utility Trailer (Single or Dual Axle)
Pros:
- Highly customizable layout
- Can be detached when not in use
- Best for large tanks and heavy gear
Cons:
- Requires more space to park and turn
- Slightly more maintenance
Recommendation:
If you’re doing mostly residential work, a truck setup may be enough. But if you’re scaling into fleet washing or commercial properties, a trailer rig is usually the most efficient. 🔧
💦 Step 2: Build Your Water System
Your water system is the heart of the operation. These are the essentials:
🔧 Pressure Washer Unit
Choose commercial-grade — 4 GPM (gallons per minute) minimum.
Cold Water Units: Cheaper, lighter, good for general cleaning.
Hot Water Units: More expensive, heavier, but essential for oil, grease, and commercial work.
Popular brands include:
- Honda (engines)
- BE Power Equipment
- Pressure Pro
- Simpson
- AR Blue Clean
👉 Invest in reliability. Repairs kill momentum.
🚰 Water Tank
Most customers expect you to bring your own water — especially for commercial jobs.
Size: 100–325 gallons is standard for mobile rigs
Mounting: Secure with straps or welded brackets
Material: Poly tanks are lightweight and corrosion-resistant
Don’t forget:
- A filter to prevent debris from damaging your pump
- A float valve to stop overflow when filling
⏳ Pro Tip: Use gravity feed into your pump to ensure smooth priming and fewer breakdowns.
🔩 Step 3: Hoses and Hose Reels
You’ll need at least three types of hoses, plus reels to keep things tidy:
1. High-Pressure Hose
- 50–200 feet (start with 100’)
- Rated for 4,000+ PSI
- Use quick-connects for fast switching
2. Garden Fill Hose
- For filling your water tank
- Connect to home faucets or on-site water sources
3. Downstream Injector Hose (Soap Line)
- Used for mixing chemicals into your spray
- Keep it separate from your water feed to avoid contamination
🔁 Hose Reels
Manual or electric reels save time and keep your rig clean.
Mount them:
- At the rear of a trailer
- On the truck bed rails
- Inside the van on a custom shelf
🎯 Efficiency Tip: Pre-plumb your hoses so you can connect, spray, and roll out without delays.
Browse Amazon Here For Mobile Pressure Washing Setups And Accessories
🧪 Step 4: Chemical Storage and Safety
You’ll need space for:
- SH (sodium hypochlorite, aka bleach)
- Surfactants
- Degreasers
- Rust and oxidation removers
Use dedicated chemical jugs (5–15 gallons), and never reuse water containers for chemicals. Color-code or label them clearly. ✅
Add a secondary containment tray to prevent spills inside your vehicle or trailer.
⚠️ Keep an eye on chemical exposure and ventilation — especially in closed vans.
🔌 Step 5: Power and Additional Equipment
🔋 Power Supply (Optional)
If you’re using electric hose reels, lighting, or a soft wash system:
- Install a deep-cycle marine battery
- Or wire an inverter into your truck’s battery system
- Add a solar charger to maintain voltage between jobs ☀️🔋
💡 Work Lights
Install LED floodlights on your rig for:
- Early morning or late-day jobs
- Garage interiors or shaded zones
- Commercial night work
🪜 Ladder Rack
Add a ladder rack for carrying:
- Extension ladders (for gutters, multi-story homes)
- Telescoping poles
- Brooms or scrubbers
Keep ladders secured to prevent shifting during transit.
🧼 Step 6: Organize for Speed and Comfort
Time is money. Smart organization can save 30–60 minutes per day.
🧰 Use Drawer Systems or Toolboxes
For:
- Nozzles and quick-connects
- Extra O-rings and fittings
- PPE (gloves, goggles, respirators)
- Wrenches and repair tools
Label drawers for speed and train your crew to restock after every job.
🔖 Mount a Job Checklist
Use a laminated checklist on your rig to:
- Verify setup
- Review equipment before departure
- Prevent forgotten gear or supplies
Attach with Velcro or inside a flip-top cover near the back gate.
📸 Branding and Professional Appearance
Your rig isn’t just equipment — it’s a rolling billboard.
Add:
- A vinyl logo on your trailer or truck
- Your phone number and website
- Bold, clear lettering visible from 30+ feet
- Optional QR code that links to your online reviews or website
Clients will often take photos of your rig or mention it in reviews. Make it work for you. 📲📷
🧠 Mistakes to Avoid
Here are some common pitfalls first-timers make when building their rigs:
🚫 Overloading your vehicle
Know your GVWR and make sure your trailer or truck can handle the weight of a full tank plus equipment.
🚫 Skimping on hose quality
Cheap hoses burst or kink constantly — costing you time and risking injury.
🚫 No backup parts
A single lost nozzle can derail your entire job. Carry spares!
🚫 Bad layout
Don’t block access to key tools — test your setup before bolting everything down.
🚫 No theft prevention
Use locks, enclosed trailers, or toolboxes for protection. Theft is more common than most new washers expect.
🛠️ Cost Breakdown (Estimates)
| Item | Cost Range |
|---|---|
| Trailer (5×10 dual axle) | $2,000–$4,500 |
| Water Tank (275 gal) | $300–$500 |
| Commercial PW (4 GPM+) | $900–$2,500 |
| Hoses + Reels | $300–$1,000 |
| Hose Fittings/Connects | $100–$300 |
| Chemicals (Initial) | $200–$500 |
| Toolbox + Ladder Rack | $150–$400 |
| Branding Wrap/Decals | $300–$1,500 |
You can build a solid, professional setup for around $5,000–$8,000 — scalable as your business grows. 📈
✅ Final Thoughts
A mobile rig isn’t just a necessity — it’s a powerful advantage. When your setup is efficient, reliable, and well-organized, you:
- Save hours every week
- Look more professional
- Increase customer trust
- Deliver consistent, high-quality results
- Grow faster with fewer headaches
Invest in the right foundation, build smart, and tweak as you go. Your mobile rig should be an asset — not a frustration. 🚐🧼🔧
Browse Amazon Here For Mobile Pressure Washing Setups And Accessories