Before you pick up a paintbrush or open a can of stain, there’s one critical step that can make or break your results: surface preparation. Whether you’re working on siding, a deck, or a fence, a clean, smooth surface is essential for proper adhesion and a long-lasting finish.
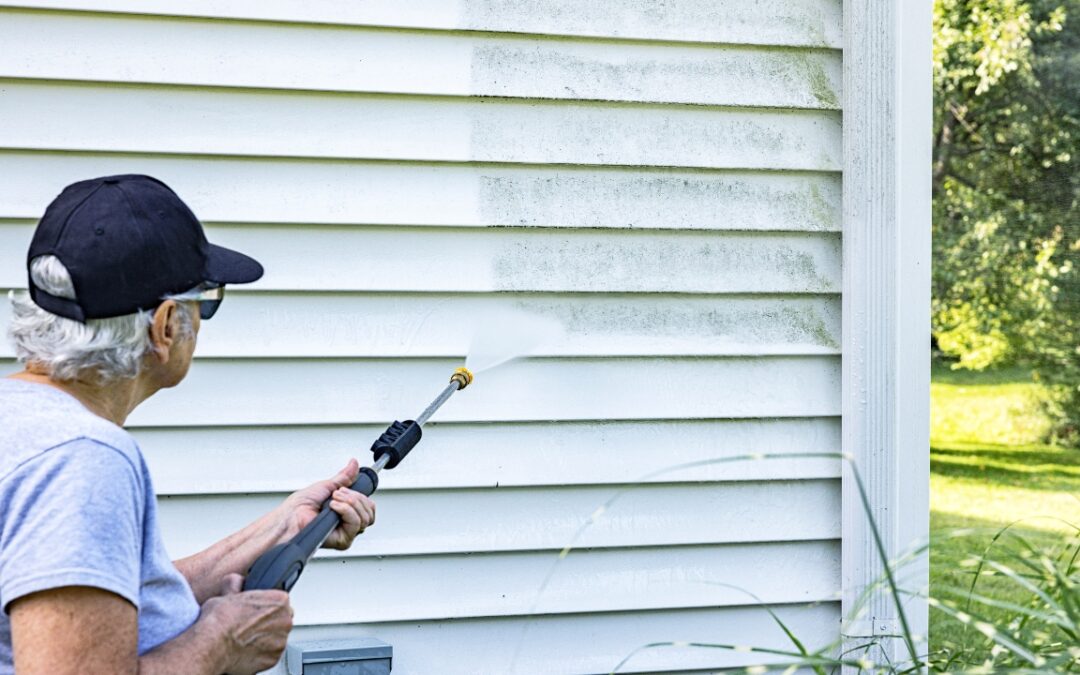
Enter power washing — your best friend when it comes to prepping exterior surfaces. Done right, it removes dirt, grime, mold, loose paint, and other contaminants that interfere with coatings. Done wrong? It can damage the surface or make the job harder later. 😬💦
In this guide, we’ll walk you through how to properly power wash before painting or staining — so your next project looks better, lasts longer, and makes the most of your effort. 🧽🖌️
🎯 Why Surface Prep Matters
Paint or stain won’t stick to dirty or flaky surfaces. Even the highest-quality products will peel, crack, or bubble if applied over grime or loose material. Power washing helps by:
- 💧 Removing built-up dirt, pollen, grease, or oil
- 🦠 Eliminating mold, mildew, or algae
- 🧱 Clearing chalky oxidation on painted surfaces
- 🪵 Opening wood grain for deeper stain penetration
- 🔥 Improving paint and stain adhesion
Think of power washing as hitting the reset button — it restores the surface to a condition where new coatings can bond properly.
🏡 What Can Be Power Washed Before Painting or Staining?
Not all surfaces need the same treatment, but power washing is ideal for:
| Surface | Power Washing Benefit |
|---|---|
| 🎨 House siding (vinyl, wood, stucco) | Removes dirt, spider webs, mold, and old paint flakes |
| 🪵 Decks and fences | Opens wood grain and clears mildew or stain residue |
| 🧱 Brick and concrete | Cleans soot, chalk, or pollution before applying sealants or coatings |
| 🚪 Garage doors and shutters | Wash away cobwebs, dust, and environmental debris |
Make sure to assess the material first — some delicate surfaces may require soft washing or lower pressure to avoid damage.
⚠️ The Danger of Skipping This Step
Skipping power washing before painting or staining can lead to:
- 🎨 Uneven or blotchy application
- 🫣 Peeling or bubbling paint within weeks
- 🪵 Stain that sits on top of wood instead of soaking in
- 💸 Shortened lifespan of your coating (and wasted money)
A quick spray from a hose isn’t enough — power washing reaches deep into cracks, fibers, and grooves to clear out the stuff you can’t see. 🕳️💧
🧰 Tools & Equipment You’ll Need
- Pressure washer (gas or electric, 1500–2500 PSI for most prep)
- Adjustable nozzle or tips (15°–40° spread recommended)
- Cleaning solution (eco-safe detergent or mildew remover)
- Soft brush (for spot scrubbing if needed)
- Protective gear (goggles, gloves, long sleeves)
- Ladder or extension wand (for higher surfaces)
If working with wood, always use the lowest effective pressure to avoid gouging or fuzzing the surface. 🪵⚠️
Browse Amazon Here For Top Rated Power Washers And Accessories
🧼 Step-by-Step Guide to Prepping a Surface with Power Washing
✅ Step 1: Inspect the Surface
Look for:
- Cracks or holes that need patching
- Loose boards, nails, or peeling paint
- Areas that may require hand scraping first
Make repairs before power washing so water doesn’t seep into openings.
✅ Step 2: Apply Cleaning Solution
Use a detergent designed for siding or wood surfaces. Apply it using the pressure washer’s soap injector or a pump sprayer.
Let it dwell for 5–10 minutes to break down contaminants — but don’t let it dry.
✅ Step 3: Wash with Moderate Pressure
Use a wide-angle tip (25° or 40°) and hold the wand 8–12 inches from the surface.
Work in even, overlapping strokes, and rinse from the bottom up (if applying soap) and then rinse from top down with clean water.
Avoid blasting upwards into siding seams or damaging soft woods like cedar or redwood.
✅ Step 4: Let the Surface Dry Completely
This is crucial!
| Surface | Recommended Dry Time |
|---|---|
| Vinyl or metal siding | 1 day |
| Painted wood | 2–3 days |
| Bare wood (for staining) | 48–72 hours minimum |
| Masonry or brick | 2–3 days |
Moisture trapped underneath paint or stain will ruin adhesion and may lead to rot or mildew. 🌞🕒
🧽 Pro Tips for Best Results
- Use a fan tip or rotating surface cleaner for decks to ensure even results
- Power wash on a clear, sunny day with no rain forecast for 48–72 hours
- Test pressure on a small, inconspicuous area first
- Tape off or cover sensitive areas like lights, electrical outlets, or landscaping
- For second stories, use an extension wand instead of climbing a ladder with a live wand
💡 When Power Washing Alone Isn’t Enough
Sometimes, power washing isn’t the whole story.
- Heavily peeling paint may still require scraping or sanding
- Grease or oil stains on concrete may need a degreaser
- Wood fuzzing from high pressure may need light sanding before staining
Always inspect after washing to decide if further prep is needed. 🔍
🎨 When to Paint or Stain After Power Washing
Once your surface is clean and completely dry, you’re ready to paint or stain.
Best Practices:
- Wait 24–72 hours for wood, depending on weather
- Avoid painting if temperatures are below 50°F or humidity is too high
- Choose the right product — some stains work better on damp wood, others require bone-dry surfaces
- For paint, always use a primer if you power washed down to bare surface
🧱 Final Thoughts: Clean First, Coat Second
Power washing is more than just a cosmetic step — it’s the foundation of a successful paint or stain job. Whether you’re restoring an old deck, refreshing your home’s siding, or coating a fence, don’t skip the prep.
With the right technique and timing, power washing ensures:
- ✨ Better product adhesion
- 🎯 Even finish
- 💪 Longer-lasting results
- 💵 Better return on your labor and investment
So, before you dive into your next project, make power washing your first stroke of success. 🎯🧼🖌️
Browse Amazon Here For Top Rated Power Washers And Accessories


